Config 記述方法 (CA)
全設定項目は こちら
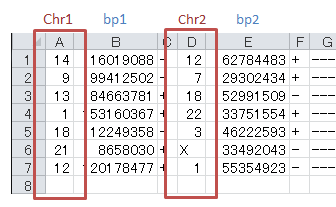
列と設定の対応
| name | input type | required | description |
|---|---|---|---|
| col_chr1 | text | o | chromosome of break point 1 |
| col_break1 | numeric | o | position of break point 1 |
| col_chr2 | text | o | chromosome of break point 2 |
| col_break2 | numeric | o | position of break point 2 |
| col_opt_ID | text | x | サンプルを識別できる名称 |
| col_opt_dir1 | text | x | direction of break point 1 |
| col_opt_dir2 | text | x | direction of break point 2 |
| col_opt_type | text | x | type of variation |
| col_opt_gene_name1 | text | x | gene name of break point 1 |
| col_opt_gene_name2 | text | x | gene name of break point 2 |
| col_opt_group | text | x | grouping of mutaions |
注釈
col_opt_groupはstackのグルーピングに使用します。
未指定の場合、intra/inter chromosomeでグルーピングします。
列を指定した場合、以下オプションによりさらに表示内容を設定することができます。
- limited_group 使用するgroupを限定する
- nouse_group 使用しないgroupを指定する
- group_colors groupの色を指定する
設定例
limited_group = stopgain,frameshift_deletion,frameshift_insertion
nouse_group = _blank_,unknown,synonymous_SNV
group_colors = stopgain:#E85299,frameshift_deletion:#F39600,frameshift_insertion:#E60011
注釈
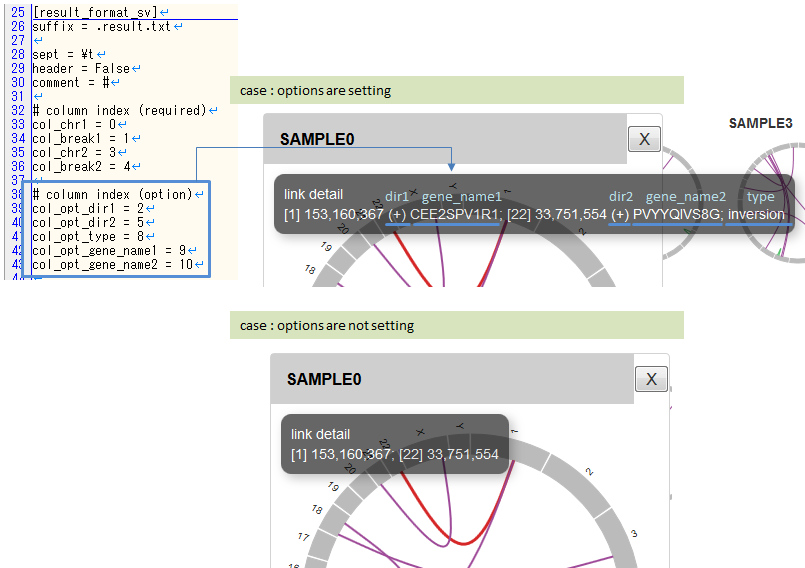
任意設定の5項目はポップアップでの詳細表示にのみ使用されます。
- col_opt_dir1
- col_opt_dir2
- col_opt_gene_name1
- col_opt_gene_name2
- col_opt_type
表示するchromosomeを限定する
configファイルで次の項目を編集してください。
[ca]
# 使用するchromosomes (,で区切る)
# default
# use_chrs = 1,2,3,4,5,6,7,8,9,10,11,12,13,14,15,16,17,18,19,20,21,22,X,Y

# chromosome 1,5,7を使用する場合
use_chrs = 1,5,7
編集したconfigファイルは次のようにしてコマンドから指定します。
paplot {input files} {output directory} {title} --config_file {config file}
ヒト以外のゲノムを使用する
genomeサイズが入力されたファイルが必要です。
先頭列にchromosome名、2列目にサイズをカンマ , もしくはタブ区切りで入力してください。
1,249250621
2,243199373
3,198022430
7,159138663
8,146364022
X,141213431
Y,135534747
9_gl000201_random,36148
11_gl000202_random,40103
17_gl000204_random,81310
17_gl000205_random,174588
Un_gl000214,137718
chromosome名は分析したいファイルのChr1, Chr2で使用されている名称と同じでなければなりません。
用意したゲノムサイズのファイルをconfig fileに指定してください。
[genome]
# ゲノムサイズのファイル(CSV形式)(デフォルトはhg19, installディレクトリ配下のgenomeディレクトリにあります)
#
# for example.
# (linux)
# path = ~/tmp/genome/hg19.csv
# (windows)
# path = C:\genome\hg19_part.csv
path = {ここにゲノムサイズのファイルのパスを指定する}